Guide: Quick Start Guide
Welcome to ActiveLink, an add-in application for Microsoft Word that makes linking content between Word and Excel more dependable. This Quick Start Guide will get you up and running in no time.
Read on to find out how to complete the most common tasks in ActiveLink.
Be sure to also check out the ActiveLink Overview video for more help with getting started.
Install ActiveLink
ActiveLink is an Add-in application developed by Donnelly Financial Solutions for use with Microsoft Word and Microsoft Excel.
To install ActiveLink
-
Your administrator should provide you with a .zip folder containing the add-in software. Save it to your computer.
- Extract all files.
- Close all instances of Microsoft Word and Excel.
-
Run the setup.exe file and follow the on-screen instructions.
Note: Microsoft .NET Framework 4.6.2 or higher is required to use the ActiveLink Add-in. If your computer doesn't have .NET Framework 4.6.2 or higher installed, click Accept in the RRD AD ActiveLink Setup window that appears to accept the EULA and install .NET Framework 4.6.2 on your computer.
- When the installation is complete, open Microsoft Word. The ActiveLink tab appears on the Microsoft Word menu bar.
Create a Named Range for a Cell in Excel
To get started with linking individual Excel cell values to Word, you first create a named range for a cell.
After you enter data in the cell, create a named range for the cell so you can link the cell to Word as an item link. You could create a named range for a cell to link a number, currency, date, percentage, or text you enter in the cell.
To create a named range for a cell
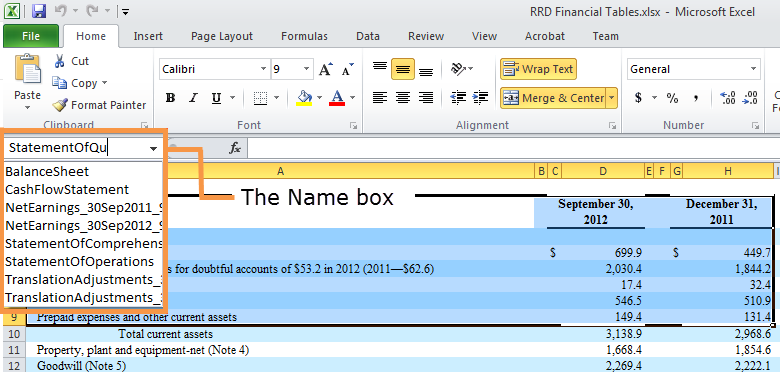
- In Excel, select the cell for which you want to create a named range.
-
Click the Name box, type a unique name for the cell, and then press Enter.


To find out more, see Create a Named Range for a Cell in Excel.
Create a Named Range for a Table in Excel
To get started with linking Excel tables to Word, you first created a named range for a table.
After you enter data or information in cells comprising a table in Excel, create a named range for the cells comprising a table so you can link the table to Word as a table link. For example, you could create a named range for a table to link a financial table or exhibit index.
To create a named range for a table in Excel
- Open the Microsoft Excel document that contains the data you want to link to a Microsoft Word document.
- Using the mouse, highlight the desired range of cells comprising the table.
-
Click the Name box, type a unique name for the range, and then press Enter.

To find out more, see Create a Named Range for a Table in Excel and How Tables are Structured in Excel.
Set How You Want Linked Content to Look in Microsoft Word
You've now created named ranges for item and table links you want to add to Word. Before you add the links to Word, you can first set how you want the data to look in Word when you add the link by setting global formatting defaults. You can do this for both Item and Table links.
Note: You always have the option later to set how an individual link will look in Word when you add the link and later after you've added the link to Word.
To set how you want content to look in Microsoft Word
- Click the Preferences button on the ActiveLink ribbon,
- To set how item links look in Word:
Click Items to open the Item Preferences dialog box.

- Use the Item Preferences dialog box to set how you want item links to look in Word and click OK.
- To set how table links look in Word:
Click Tables to open the Table Preferences dialog box.

- Set how you want to tables to look in Word and click OK.
To find out more, see Table Preferences dialog box and Item Preferences dialog box.
You can always update the formatting preferences applied to a link after you've added the link to Word. To find out more, read on below or see Update the Formatting Preferences Applied to Links Added to Word.
Add a Link to Microsoft Word
After you name a cell (item link) or range of cells (table link) in Excel and specify how you want the data to look in Word, you now ready to add links to Word.
If you add a single cell value to Word, you add an item link to Word. If you add a range of cells to Word, you add a table link to Word.
To add a link to Microsoft Word
- In Microsoft Excel, open the document(s) that contains the named ranges.
- In Microsoft Word, open the document to which you want to add the table.
-
Place the cursor in the Word document where you want the linked content to appear.
Note: When you add a table link, make sure there are at least two blank lines separating the content above and below the desired location for the linked table. When you add an item link to which the Paragraph formatting preference will be applied, make sure you add this link on a new line.
-
From the ActiveLink ribbon, click Add Link to open the Add Link pane in the Index panel, Add Link tab.

- From the ActiveLink pane, select the named range you want to add.
- Set the formatting preferences you want to apply to the link.
- To add the link, double-click the named range or click Add Link.
To find out more, see Add a Table Link in Microsoft Word and Add a Cell (Item) Link in Microsoft Word.
Update a Link in Microsoft Word
When you edit the content contained in named ranges in Excel for links you've added to Word, you'll need to update the link in Microsoft Word so this latest content is reflected in the Word document. You can quickly do this for a single link or multiple links at the same time
To update the content, you typically refresh the changes in Word.
However, if you change the size or shape of a table by adding row(s) or column(s) or only change the character formatting of text to which the Paragraph formatting category is applied, you reload these changes in Word. Reloading a link also updates the link's content, when applicable.
To refresh a link in Microsoft Word
- Open the Index panel, ActiveLinks tab:
- Do one of the following:
- Select the check box next to each link to refresh, click the Options icon
 , and click Refresh Link(s) from the menu that appears.
Right-click the single link to refresh and click Refresh Link from the menu that appears.

- Select the check box next to each link to refresh, click the Options icon
- Follow the steps in the Refresh Links dialog box to finish refreshing the links.
To find out more about refreshing links, see Update a Link in Microsoft Word.
To reload a link in Microsoft Word
-
From the ActiveLink ribbon, click Index.

- From the Index panel, ActiveLinks tab, do one of the following:
-
Right-click the link the single link to refresh and click Reload Link from the menu that appears.

-
Select the check box next to single link to reload, click the Options icon
, and click Reload Link from the menu that opens. 
The Reload Link progress bar provides the status of the link being reloaded and alerts you when the table has finished reloading.

The updated values appear in your Word document.
To find out more about reloading links, see Update a Link in Microsoft Word.
Update the Formatting Preferences Applied to a Link Added to Word
You can always change the formatting preferences applied to a link after you've added the link to Word. For example, you could change the table alignment applied to tables or change how numbers display in Word.
Note: For item links, you can update the formatting preferences applied to one item link at a time. For table links, you can update the formatting preferences applied to one or multiple table links at one time.
To update the formatting preferences applied to links added to Word
-
From the ActiveLink ribbon, click Index. The Index panel, ActiveLinks tab opens.
- From the Index panel, ActiveLinks tab, do one of the following:
To update the formatting preferences applied to a single table or item link, right-click the single item or table link for which you want to update the link's formatting preferences and click Edit Link Preferences from the menu that appears.
Note: To update the formatting preferences applied to a single table or item link, you can also select the check box next to the link, click the Options
icon, and click Edit Link Preferences from the menu that appears. 
To update the formatting preferences applied to multiple table links, select the check box next to each table link for which you want to update the link's formatting preferences, click the Options icon
, and click Edit Link Preferences from the menu that appears.
-
The ActiveLink - Preferences dialog box appears. Use the ActiveLink - Preferences dialog box to update the formatting preferences applied to the link(s) you selected.

Note if you selected multiple table links, ActiveLink - Preferences for Selected Links displays at the top of the ActiveLink - Preferences dialog box.
- Click Apply to update the formatting preferences applied to an item link or click OK to update the formatting preferences applied to table link(s). The formatting preferences are updated.
- If you updated a table link, you'll need to reload the link to finish applying the changes.
To find out more, see Update the Formatting Preferences Applied to a Link Added to Word.
Update the Path to a Link's Excel Workbook
If there is a change in the path to the Excel workbook that links added to Word reference, you can easily update the links you've added to Word to reference the new path. You must do this when the path changes to maintain the connection between Excel and Word. For example, if you rename an Excel workbook that links in Word reference, you must update the links with the path to the renamed workbook to maintain the links' connection between Excel and Word.
In addition, when an Excel workbook changes location, you must update the links in Word with the new path to maintain the links' connection between Excel and Word.
Note: To use an Excel workbook with ActiveLink, the Excel workbook must either be saved to your computer's hard drive or stored in a network drive or in an ActiveDisclosure project. All other storage locations are not supported by ActiveLink. For more information, see Supported Storage Locations for Excel Workbooks.
To update the path to a link's Excel workbook
- With the Word document open, click Index from the ActiveLink ribbon. The Index panel, ActiveLinks tab opens.
-
In the Index panel, ActiveLinks tab, select the links for which you want to update the path to the Excel workbook:
-
To update the Excel path for the individual links you specify, select the check box next to each link you want to update, click the Options icon
, and then select Update Excel Path from the menu that appears.
Note: To update the Excel workbook path for a single link, you can also right-click the link and select Update Excel Path from the menu that appears.
-
To update the Excel path for the links that reference the same workbook, click the drop-down below the ActiveLinks tab, select View By Workbook, and then select the check box next to workbook(s) for which you want to update the path.

The Update Excel Path window opens, listing the links you've selected to update with an updated path to the Excel file.

-
-
Enter the path to the Excel file in the File path field or click Browse to browse to and select the Excel file.
Note: If you enter a file path to a file that is an unsupported file type or enter a file path that exceeds 255 characters, the red validation box that surrounds the File Path field does not disappear.
-
Click Update. The links are updated with the new path to the Excel specified Excel file.
Note: If any errors occur during the update for a link, the link is not updated but the rest of the links will be updated with the path to the specified Excel file.
- Optionally, use the Filter by check boxes to filter the links by result of the Update Path operation.
- Errors: Filter the links that were not updated with the path to the selected Excel file because an error occurred during the Update Path operation for this link. For example, an error will occur when the inputted Excel file does not exist.
- Complete: Filter the links that were successfully updated with a new path to the selected Excel file.
- No Changes: Select or uncheck this check box to list or hide links that were not updated because they already referenced the Excel file selected.
Note: If all of the Filter by check boxes are greyed out, all of the links' paths were successfully updated to the Excel file you specified.


Break a Link in Microsoft Word
If you've added a link in Microsoft Word that you no longer need to update, you can disable the link using the Break Link operation. When you break a link, this link's content remains in Word but the link is no longer updated.
For example, when you make updates to a named range in Excel that is linked in multiple places in the Word document including as one broken link, all other links are updated with the link's changes when you refresh the link in Word but the broken link is not updated.
To break a link in Microsoft Word
- With the Word document open, click Index from the ActiveLink ribbon.
- From the Index panel, ActiveLinks tab, select one or more links to break
- Click
the Options icon to open the
menu.
-
Click Break Link(s).
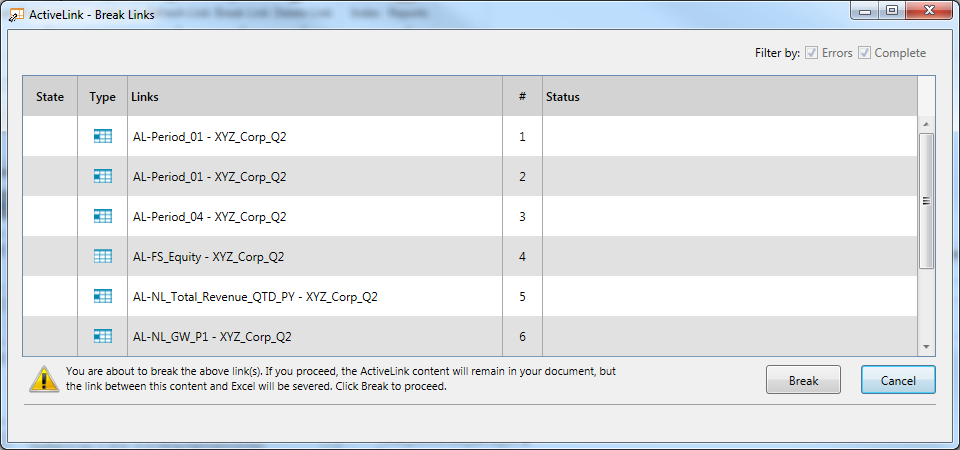
The Break Links window opens, listing the links that you have selected to break.
- To break the selected links, click Break.
To find out more, see Break a link in Microsoft Word.
Restore a Broken Link in Microsoft Word
After you break a link, you may need to reestablish this link's connection between Word and Excel again so you can update the link again with the named range's latest content in Excel.
To restore a broken link in Microsoft Word
- With the Word document open, click Index from the ActiveLink ribbon. The Index panel opens.
- From the Index panel, click the Broken Links tab.
- Right-click a single you want to restore. A menu appears.
- Click Restore Link from the menu.
Note: You can restore a single broken link at one time.
To find out more, see Restore a Broken Link in Microsoft Word.
Delete a Link in Microsoft Word
If you've added a link in Microsoft Word that you want to remove, you can remove the link using the Delete Link operation. When you delete a link, the linked content is removed from Word. You can delete both ActiveLinks and broken links. Both methods are described below.
When you delete a link, you do not remove other instances of the same link added elsewhere in the Word document (unless you select the other instances). In addition, when you delete a link, you do not delete the named range or corresponding cell value(s) in Excel.
To delete a link in Microsoft Word
-
With the Word document open, click Index from the ActiveLink ribbon. The Index panel, ActiveLinks tab opens.
- Do one of the following:
Right-click a single link to delete and click Delete Link from the menu that appears.

Select the check box next to the links to delete, click the Options icon
, and click Delete Link(s) from the menu that appears.
-
In the Delete Links dialog box, click Delete to delete the selected link(s). When the Delete Links operation is successful, the link is no longer listed in the ActiveLinks tab and the corresponding linked content is removed from Word.
To delete a broken link in Microsoft Word
-
With the Word document open, click Index from the ActiveLink ribbon. The Index panel, ActiveLinks tab opens.
- Click the Broken Links tab.
- Do one of the following:
Right-click a single broken link to delete and click Delete Link from the menu that appears.
Select the check box next to the broken links to delete, click the Options icon
, and click Delete Link(s) from the menu that appears.
-
In the Delete Links dialog box, click Delete to delete the selected link(s). When the Delete Links operation is successful, the link is no longer listed in the Broken Links tab and the corresponding linked content is removed from Word.
To find out more about deleting links, see Delete a Link in Microsoft Word.